Wednesday, May 1, 2013

Dairy-Free Carrot Cake Cupcakes with Cream Cheese Icing

Yeah, that's right. I said dairy-free cream cheese icing. It can be done and you won't know the difference!


The BEST Carrot Cake Recipe EVER can be found over here at Pinch of Yum. I followed the instructions for the cupcake version. I also mixed the wet and sugar ingredients first, then saved the dry ingredients for last. Tip for success: always sift your flour and after you add the dry ingredients, only mix enough to combine, on low speed.

 Dairy-Free Cream Cheese Icing Recipe
 

 Ingredients: 
8oz Dairy-Free Cream Cheese Alternative (I used Tofutti Brand, but it is soy based)
1/4 lb Dairy-Free Butter Alternative (I use Earth Balance Brand)
2 tsp bourbon vanilla paste
1 lb = 4 cups powdered sugar (give or take)


  Directions:
Make sure cream cheese and butter are the same temperature. Beat on high speed in mixer until combined. Add vanilla and sugar until desired consistency is reached. Increase speed of mixer to high until combined. (I like a thicker icing so that the form holds on cupcakes. If I were icing a cake, would go softer.)


Using pastry bag, pipe onto cupcakes, starting from exterior perimeter moving inward and spiraling up. The key is more squeeze, less movement.

Decorations on top are by Wilton.

I made these for my dear friend Libby's going away party. She is a fellow dairy avoider ;) I will miss you friend!


Vegan Vanilla-Mint Chocolate Whoopie Pies!

I knew I was making progress when my husband tasted one and said, "I can't even tell there is no dairy in these!"


The key to success in dairy-free baking with icing is fake butter. I am currently using Earth Balance products. They do make a soy-free version as well. Found it at Whole Foods, it has red on the label. While I was there, I also found baking sticks, which makes it MUCH easier to measure (but has soy). So far, I have substituted it for butter in some of my favorite icing recipes and no one can tell the difference!

I needed to go to the store the other day, but was craving sweets in a major way. So I browsed my cupboard, and looked up some recipes on Go Dairy Free. I came across these Fudgy Chip Vegan Cookies and made them immediately! I had everything but the chocolate chips and nuts. So, I made a basic chocolate cookie. Scooped them out in a mini scoop, pressed down before baking with a spatula, and baked for 12 min. Key to a successful, moist cookie? Fight every urge inside of you and pull them out before they look done!

From there I decided they were too plain, so why not make them into mini whoopie pies? Lets take it up a notch and make some vanilla mint buttercream icing!

Dairy-Free Vanilla-Mint Whoopie Pie Frosting:
2 cups powdered sugar
1/3 cup dairy-free butter alternative
1 tsp mint extract
1 tsp bourbon vanilla paste
2 tbs almond milk (or other dairy-free milk substitute)

Mix all ingredients except for the almond milk together and beat until creamy. Add milk until you reach desired consistency.

Add a dollop of icing to cooled cookies and make sandwiches! Remember, it takes 2 cookies for one whoopie pie so don't be disappointed when your numbers are cut in half. Make a double recipe of cookies if needed!

Bucket List: Cake Baking Class

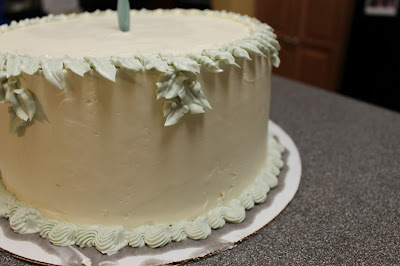
We housed our dear friend Nate while he was transitioning his family to C'ville this winter, and in return, he and his wonderful wife Marge signed me up for a local cake baking class. I think I had a bit of a girl crush on our instructor, as she lives out in the mountains and raises her own chickens for fresh eggs. She got down to the nitty gritty science of baking, and I picked up a TON of great tricks. I was taking notes like a mad woman.
And at the end, when I created an even, meticulous cake structure, that did not self implode, I cried a bit. Yup, real tears of joy in my eyes. Could also have been that it was my first time away from these two partners in crime!

Here is the result! I spent a lot of time on the structure and not enough time on the decorating, but I'll eventually work on it. Practice makes perfect! Happy Birthday John!


Best tip from the class: Put your baking soda and baking powder in mason jars. This way they stay fresh and don't absorb moisture or smells around the kitchen.
Wishlist items added: Quality cake knife, cake spinner.

Friday, March 29, 2013

Dairy-Free Banana Bread

That moment when you took too long to eat those bananas, your grocery budget is just too tight, and you feel compelled to make something of those over-ripe browning bananas in your fruit bowl. Enter banana bread! How does one make banana bread without butter? Well, I found out. It came out deliciously moist, not too sweet, and a perfectly crusty crust.


 Here is my recipe:

Ingredients:
  • 1/4 cup oil (I used canola)
  • 1/4 cup coconut oil
  • 1/2 cup granulated sugar
  • 1/2 cup brown sugar
  • 1 egg (lets be honest, I prefer local farm eggs!)
  • 1 and 1/2 cups flour
  • 1 teaspoon baking soda
  • 1/4 teaspoon salt
  • 1/4 teaspoon cinnamon
  • 3 mashed bananas
Directions:
  1. Preheat oven to 325.
  2. In mixer, add oils, sugar, and egg. Blend until mixed.
  3. Meanwhile, mix dry ingredients in small bowl and mash bananas.
  4. Add dry ingredients to mixer bowl and blend until mixed.
  5. Add bananas, blend until mixed.
  6. Pour in greased* baking loaf and bake for 1hr 10 min or until toothpick comes out clean.
  7. Enjoy warm!
*I found a dairy/soy free cooking spray at Whole Foods that I now use to grease my cooking pans: Spectrum brand "Butter It Up!" Natural flavor spray oil. Ingredients: canola oil, sunflower oil, natural non-dairy flavor, annatto extract for color.

Monday, March 25, 2013

Cupcakes: His and Hers

This winter, my lovely friends Patrick and Marie tied the knot. They have been fans of my cupcakes over the years and I was thrilled to create some treats for their rehearsal dinner that truly reflected the tastes of the bride and groom.

For the groom: Diet Coke Cupcakes


For the Bride: Strawberry Shortcake Cupcakes

The funny story is that I had to create my own Diet Coke Cupcake recipe as none exist that I could find. There was also a temporary shortage of strawberries the week I made them, and I think I obtained the last strawberries in Charlottesville that night. Never a dull moment in the baking world! It was a treat to get some creative juices flowing and I think they came out great!
A match made in heaven!


Here's a look at the process:


Blast From Past: Watermelon Chiffon Pie

We had half a watermelon left over in the fridge. Wasted produce really irks me. This is where I get half my motivation to make delicious pie! Waste not, want not ;)

I came across a picture of this amazing pie and it was too gorgeous, too intriguing not to try. Warning: it is not for the faint of heart. It takes time, many bowls, and mad whipping skills! I found the recipe here, and it is pretty identical to the one in my amazing pie book too. This pic is from the source website:

Ingredients:


* 1 graham cracker crumb crust (Store bought or homemade)

Filling

* 6 cups watermelon (seeds are fine)
* 1/3 cup granulated sugar
* 2 tablespoons unflavored gelatin (aka, two envelopes)
* 1 tablespoon fresh lime juice or 1 tablespoon lemon juice
* 2 large egg whites, at room temperature
* 1 cup cold heavy cream or 1 cup whipping cream
* 1 cup confectioners' sugar, sifted

Garnish


* confectioners' sugar, to dust
* whipped cream (homemade or store bought)

Directions:


1. Place a medium sized bowl and a set of beaters in the refrigerator to chill.
2. Bake pie crust according to directions and let cool; Refrigerate until ready to use.
3. Combine the watermelon and granulated sugar in a very large bowl; using a potato masher, mash until the mixture is quite liquid; set aside for 15 minutes.
4. After 15 minutes, drain the mixture through a strainer, reserving almost 2 ¾ cups of the watermelon juice and then discard pulp and seeds.
5. Put ¼ cup of the juice in a medium size bowl and sprinkle the gelatin over it; set aside for 3 to 4 minutes to dissolve.
6. Heat ½ cup of the juice in a small saucepan over medium heat (or in the microwave) to a near boil; whisk the hot juice into the dissolved gelatin.
7. Pour the remaining 2 cups watermelon juice into a large bowl an stir in the gelatin-watermelon juice mixture; stir in the lime juice; place in refrigerator.
8. Using an electric mixer, beat the egg whites in a medium size bowl until stiff peaks form; set aside; clean and dry beaters;
9. Using the chilled medium-size bowl and chilled beaters, beat the heavy cream with the mixer until it holds soft peaks; add the confectioners? sugar and beat until smooth and stiff but not grainy; refrigerate.
10. When the watermelon juice mixture starts to firm up, add about one-quarter of the whipped cream and beat with the electric mixer until smooth.
11. Add the beaten egg whites and remaining whipped cream and gently fold them in with a large rubber spatula; if necessary, use a whisk-very briefly-to smooth the mixture and break up any large globs of whites or whipped cream.
12. Pour the filling into the cooled pie shell; shake to settle; cover with loosely tented aluminum foil and refrigerate for at least 4 hours, preferably overnight.
13. To serve, garnish each slice with a dusting of confectioners sugar, and then add a dollop of whipped cream, if desired.

Back In the Saddle: Dairy/Soy-Free

I kind of fell off the face of the earth for awhile there! Mothering a toddler can do that to you. Since I last wrote, we added another bundle to our family: Eloise Anne! She is cute as can be with chubby cheeks made for endless kisses. She has also put me through the ringer with her dairy and soy allergies and subsequent reflux. Being a nursing mother, it means I am now too dairy and soy-free. What is a baker to do when she kisses goodbye her precious butter and cream? 6 months later, I am finally through the mourning stages and here we are at acceptance. Time to change my game. And permanently change it I will, as some of my very own GI issues have  been healed with my new diet. My eyes have been opened to a whole  new culture of nutritional wellness and food alternatives. Dare I say I've made friends with the Vegans as their baked goods are the only ones to be found without dairy?! There is little out there on my particular diet, as I still love me some eggs and meat, so I've decided to share my adventures here in hopes of helping others with dairy allergies and sweet nursing babies with intolerances. Hope you enjoy this adventure with me!

Photo credit: Lucy O Photo


Here are a few tidbits I've learned:

Most babies will outgrow their dairy allergy, but this can take up to 3 years.
A strong percentage of babies allergic to dairy are also allergic to soy.
There are very few formula options for babies such as mine, and they all taste horrible.
Breastfeeding these babies is the best option, but means mom also too embraces a dairy and soy-free diet.
Babies are actually sensitive to the protein in milk, as opposed to lactose, and this can take 1-3 weeks to clear from mom and baby's system once consumed.

Dairy can come under many other names: Go Dairy Free has a great reference page for this.
Dr. Sears has a great description on infant dairy allergy.